Biostar TF7050-M2 Gigabit Ethernet under Ubuntu

After several years of not bothering, I finally got Gigabit ethernet working on my old Linux server, which has a Biostar TF8050-M2 motherboard. The motherboard has a Realtek 8111B PCI-E LAN controller, which is supposed to be 10/100/1000 (Ethernet, Fast Ethernet, Gigabit) capable, but when transferring files over Samba, I never saw more than 10 megabytes per second. After fixing the issue, my network transfers jumped to 41MB/s, as reported by TeraCopy.

Verify Current Speed

To verify that you’re running at less that Gigabit speeds, run ethtool. Here’s the output after I fixed my problem:

$ ethtool eth0
Settings for eth0:
        Supported ports: [ TP ]
        Supported link modes:   10baseT/Half 10baseT/Full
                                100baseT/Half 100baseT/Full
                                1000baseT/Full
        Supported pause frame use: No
        Supports auto-negotiation: Yes
        Advertised link modes:  10baseT/Half 10baseT/Full
                                100baseT/Half 100baseT/Full
                                1000baseT/Full
        Advertised pause frame use: Symmetric Receive-only
        Advertised auto-negotiation: Yes
        Speed: 1000Mb/s                             <=== Look at this line
        Duplex: Full
        Port: Twisted Pair
        PHYAD: 0
        Transceiver: internal
        Auto-negotiation: on
        MDI-X: Unknown

If your listing shows "Speed: 100Mb/s", then you're only getting Fast Ethernet (100 megabits per second) speeds.

Replace the Driver

I replaced the default Realtek driver, which is for the r8169 (check which driver you have by running lsmod | grep r.* and look for something like r8169), with an updated R8168 driver from the Realtek website.

I followed the instructions from this Ubuntu Forums post, but I found that they can be reduced to the following:

  1. Download the latest drivers from the Realtek site.
  2. Unpack the archive (tar xvjf r8168-x.xxx.xx.tar.bz2).
  3. Change into the new directory and execute autorun.sh with administrative privileges (cd r8168-x.xxx.xx followed by sudo ./autorun.sh).

The autorun.sh script will automatically remove the existing r8169 module and replace it with the correct r8168 one. This worked, even over an ssh session, though the connection dropped while the operation completed.

Power Cycle the Switch

After updating the driver, I was still only seeing Fast Ethernet speeds. The lights on my Linksys GS105 switch indicated 100Mb/s connections. Unplugging and re-plugging cables would sometimes change the indicators to Gigabit, and other times it would simply kill the connection. I finally unplugged the switch for thirty seconds, plugged it back in, and suddenly had Gigabit speeds.

Posted in Linux, Technology | Leave a comment

Visual Studio Debugging – Accessibility Applications with uiAccess Attribute Set

Debugging the application from Visual Studio first resulted in a dialog telling me I needed to restart Visual Studio as Administrator. After doing so, trying to run in the debugger resulted in an error that read, “Unable to start program” and “The application manifest has the uiAccess attribute set to ‘true’. Running an Accessibility application requires following the steps described in Help.” Of course, the ‘Help’ button takes me nowhere useful.

Running the application from Explorer resulted in a dialog that said, “A referral was returned from the server.”

  1. Find the signed executable in Windows Explorer.
  2. Right click and select Properties.
  3. Select the Digital Signatures tab.
  4. Double-click the signature.
  5. Click View Certificate.
  6. Click Install Certificate.
  7. Click Next.
  8. Select “Place all certificates in the following store”.
  9. Select a “Trusted Root Certificate Authorities”.
  10. Click OK.
  11. Click Next.
  12. Click Finish.
  13. In the Security Warning dialog, click Yes.

This allows the executable to be run directly. Unfortunately, it still doesn’t fix the issue with debugging from Visual Studio. It appears that the only solution is to run the executable directly, then attach the debugger to the running process!

Posted in Technology, Windows | Leave a comment

Exporting Visual Studio-compatible Bitmaps from GIMP

Gimp_ExportingForVisualStudio_Options

When exporting bitmaps from GIMP, two options must be selected in order for the bitmaps to be compatible with Visual Studio:

  1. Under Compatibility Options, check “Do not write color space information”.
  2. Under Advanced Options, select “R8 G8 B8” under 24 bits.
Posted in Technology, Windows | 1 Comment

Microsoft IME for Japanese Input

I’ve found the keyboard shortcuts for the Microsoft IME (Input Method Editor) to be poorly documented. I’ve tried to collect all of them here.

Switching Between Input Languages

MicrosoftIME_JapaneseInputLanguageMenuThese keyboard shortcuts switch between, for example, English and Japanese input languages. This is equivalent to clicking on the language abbreviation (e.g. EN, JP) in the IME Toolbar.

Left Alt + Shift or
Ctrl + Shift or
Grave Accent (`) – switch input language (default is Left Alt + Shift)

Ctrl + Shift or
Left Alt + Shift or
Grave Accent (`) – switch keyboard layout (not assigned by default). An example of usage would be to switch between “US” and the “United States – International” keyboard layouts, assuming they have been configured in Text Services and Input Languages.

Switching Between Input Modes

MicrosoftIME_JapaneseInputMenu
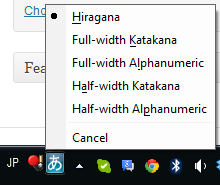
Once Japanese language input is selected, the following shortcuts can be used to change the input mode between hiragana, katakana, and alphanumeric. This is equivalent to clicking on the input menu in the IME bar:

Ctrl + Caps Lock – switch to hiragana

Alt + Caps Lock – switch to katakana

Shift + Caps Lock – switch between full-width hiragana and full-width alphanumeric (romaji).

Alt + Grave Accent (`) – switch between kana and half-width alphanumeric (romaji).

String Conversion

When typing using IME, while a sequence is still underlined, these shortcuts can be used to convert the underlined portion between hiragana, katakana, romaji, both full- and half-width. Note that these conversions cannot be performed after moving on to the next input block (i.e., it is not possible to double-click and existing word and convert it).

F6 - converts to hiragana:

ホワイト becomes ほわいと

F7 – converts to katakana:

ほわいと becomes ホワイト

F8 – converts to half-width katakana:

ホワイト becomes ホワイト

F9 – converts to full-width romaji, press again for all-capitals, then again for proper noun capitalization:

ホワイト becomes howaito, press F9 again for HOWAITO, and again for Howaito

F10 – convert to half-width romaji, press again for all-capitals, and again for proper noun capitalization:

ホワイト becomes howaito, press F10 again for HOWAITO, and again for Howaito

More Conversion Examples

Typing katakana, then pressing F10 and F7 alternately will convert the string back and forth between katakana and half-width romaji.

Typing hiragana, then pressing F10 and F6 alternately will convert the string back and forth between hiragana and half-width romaji.

Typing hiragana, then pressing F7 and F6 alternately will convert the string between hiragana and katakana.

Typing katakana, then pressing F6 and F7 alternately will convert the string between katakana and hiragana.

Quotes

MicrosoftIME_QuoteCharacters
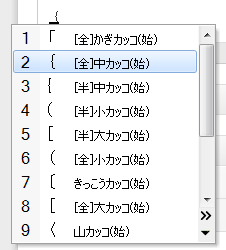
Basic opening and closing quotes (「」), type the left and right bracket ([, ]), respectively. To access more quote styles, type the open or closing bracket, then press the space bar for the conversion menu. Another option is to type kakko (Japanese for “brackets”), press the space bar for the completion menu, and scroll down.

「」 〈〉 《》

Katakana-specific Shortcuts

These shortcuts only have meaning in the katakana input mode.

Long vowel – press the ‘minus’ key (next to equals on US keyboards):

ソーダ (soda)

Separator – type a forward slash ‘/’:

ジョン・ホワイト (John White)

Traditionally, Japanese doesn’t have a “ti” sound, so it was translated as チ (chi, e.g. ticket becomes “チケット”, “chiketo”). In order to write ‘ti’, type thi or texi. For ‘di’, type dhi or dexi.

ティ・ディ

Posted in Technology, Windows, 日本語 | Leave a comment

Setting Global C++ Include Paths in Visual Studio 2012 (and 2013, and 2010)

Starting with Visual Studio 2010, Microsoft decided to make life hard on C++ developers.  System-wide include path settings used to be accessed through Tools | Options | Projects and Solutions | VC++ Directories.  However, that option is gone:

VS2012_ToolsOptionsDirectories

Instead, the system-wide include paths are now located within the ‘Properties’ interface.  To access it, select View | Property Manager.  No dialog will appear yet. Instead, the Property Manager appears as a tab along with the Solution Explorer:

VS2012_OptionsPropertyManager

Note:  The Property Manager won’t contain anything unless a solution is loaded.

If the Property Manager is missing, it can be shown by selecting View | Other Windows | Property Manager from the menu.

Now, expand one of your projects, then expand Debug | Win32 or Release | Win32:

VS2012_PropertyPageProjectExpanded

Right click Microsoft.Cpp.Win32.user and select Properties: VS2012_PropertyPageProjectExpandedMenu

This brings up the Microsoft.Cpp.Win32.User Property Pages dialog, which should look familiar enough:

VS2012_Win32UserPropertyPage

Alternate Access The properties can be accessed directly as an XML file by editing

%LOCALAPPDATA%\Microsoft\MSBuild\v4.0\Microsoft.Cpp.Win32.user.props

VS2012_Win32UserPropsXML

Rant: None of this makes any sense whatsoever. Why do I have to have a solution loaded before I can edit the system-wide (technically user-wide) path settings?  The old system made sense: project-specific include paths were set in the properties of individual projects, and system include paths were set through the Tools menu. The layout is irritating, forgettable, and, most importantly, it makes absolutely no sense to access system settings by clicking through your own projects!

Posted in Technology, Windows | 3 Comments

How Do I Know What Ubuntu Version Number I Have?

lsb_release -a

Posted in Linux, Technology | Leave a comment

Console2 and Cygwin with Solarized Color Palette

If you want to use Ethan Schoonover’s Solarized color palette with Console2 and Cygwin, here’s how:

  1. Edit the console settings file at %LOCALAPPDATA%\Console2\console.xml or %APPDATA%\Console\console.xml.
  2. Replace the <colors> ... </colors> section with the following:
    <colors>
       <color id="0" r="7" g="54" b="66"/>         <!-- black -->
       <color id="1" r="38" g="139" b="210"/>      <!-- blue -->
       <color id="2" r="133" g="153" b="0"/>       <!-- green -->
       <color id="3" r="42" g="161" b="152"/>      <!-- cyan -->
       <color id="4" r="220" g="50" b="47"/>       <!-- red -->
       <color id="5" r="211" g="54" b="130"/>      <!-- magenta -->
       <color id="6" r="181" g="137" b="0"/>       <!-- yellow/brown -->
       <color id="7" r="238" g="232" b="213"/>     <!-- white -->
       <color id="8" r="0" g="43" b="54"/>         <!-- brblack --> 
       <color id="9" r="131" g="148" b="150"/>     <!-- brblue -->
       <color id="10" r="88" g="110" b="117"/>     <!-- brgreen -->
       <color id="11" r="147" g="161" b="161"/>    <!-- brcyan -->
       <color id="12" r="203" g="75" b="22"/>      <!-- brred -->
       <color id="13" r="108" g="113" b="196"/>    <!-- brmagenta/violet -->
       <color id="14" r="101" g="123" b="131"/>    <!-- bryellow -->
       <color id="15" r="253" g="246" b="227"/>    <!-- brwhite  -->
    </colors>
    
  3. Restart Console2.

Colors in vim look good:

Editing a CPP file in vim

Cygwin ls colors are a bit odd compared to other platforms:

Cygwin directory listing

Posted in Cygwin, Technology, Windows | 1 Comment

How to Build Microsoft Detours Express (32-bit) on 64-bit Windows

Microsoft Detours Express, which is 32-bit only, can still be built on 64-bit operating systems. Here’s how:

  1. Open a 32-bit Command Prompt (C:\Windows\SysWow64\cmd.exe).
  2. Run VCVARS32.BAT
    • VS2010: "C:\Program Files (x86)\Microsoft Visual Studio 10.0\VC\bin\vcvars32.bat"
    • VS2008: "C:\Program Files (x86)\Microsoft Visual Studio 9.0\VC\bin\vcvars32.bat"
  3. Set the target processor to x86 (set DETOURS_TARGET_PROCESSOR=X86).
  4. Build Detours using nmake.
Posted in Technology, Windows | Leave a comment

What Exactly Are ATL’s BEGIN_COM_MAP, END_COM_MAP, and COM_INTERFACE_ENTRY Macros?

There are many places where ATL’s COM_MAP macros are documented, but I haven’t seen it plainly stated what they actually mean.

Simply put, BEGIN_COM_MAP implements _InternalQueryInterface. COM_INTERFACE_ENTRY indicates that your class supports the specified interface. END_COM_MAP finishes the _InternalQueryInterface implementation.

Note: A QueryInterface implementation which calls this _InternalQueryInterface method must either be hand-coded, or supplied by CComObject, CComAggObject, etc.

For example:

class MyClass :
    public CComObjectRoot,
    public ISomeInterface
{
public:
    BEGIN_COM_MAP(MyClass)
        COM_INTERFACE_ENTRY(ISomeInterface)
    END_COM_MAP()
};

CComClass myInstance = new CComClass;

The COM_INTERFACE_ENTRY line indicates that MyClass implements ISomeInterface. If QueryInterface is called to requests an ISomeInterface pointer, the call will succeed. Without the COM_INTERFACE_ENTRY line, the QueryInterface call would fail.

Posted in C++, COM, Technology, Windows | Leave a comment

Skype 5.5 Cannot Display Asian Characters

After upgrading to Skype 5.5, I found that Japanese and Chinese characters showed as a series of boxes. I could type or paste them and they would be visible on the other end, but not on my end. Similarly, if the other person wrote Asian characters, they would not render correctly, like this:


A temporary fix is to change the IM font to Arial Unicode MS, which may have to be enabled from the control panel. Here are the steps:

  1. In the Skype menu, select Tools | Options, then click on “IM & SMS”, then “IM appearance”:


  2. Click on “Change font” to bring up the font dialog:


  3. If “Arial Unicode MS” is available, select it, click OK, then Save, and you’re done.

    If “Arial Unicode MS” is not available, then click “Show More Fonts” to bring up the Control Panel’s Font selector:


  4. Locate “Arial Unicode MS”, click on it to select it, then click on “Show” in the toolbar. Close the Fonts window (click the red X). You will have to close the Font dialog as well, then reopen it, in order for the Arial Unicode MS font to be displayed.

Posted in Technology | Leave a comment